The Anatomy of Partial Restoration: Navigating the Intersection of Structural Integrity and Fiscal Constraint
How to plan panel replacement on a budget the decision to replace a specific section of an overhead door system rather than commissions a full installation is often characterized as a compromise. In reality, it is a sophisticated exercise in asset management. A garage door is modular by design; it is a series of interconnected panels that function as a cohesive barrier. When a single panel sustains localized damage—whether through an automotive impact, environmental corrosion, or structural fatigue—the immediate response of many homeowners is to replace the entire assembly. However, from a structural engineering and economic perspective, this is frequently unnecessary and represents a massive inefficiency in residential resource allocation.
Successful partial restoration requires a technical understanding of the “generation gap” in manufacturing. Garage door models are not evergreen; manufacturers rotate designs, stamping patterns, and color profiles with the same frequency as other consumer industries. Consequently, the primary challenge of a panel-specific project is not the physical installation, but the procurement of a compatible component that maintains the system’s structural equilibrium and aesthetic continuity. If the door is more than a decade old, finding a match becomes an exercise in forensic sourcing and logistical patience.
This editorial investigation deconstructs the process of localized replacement, focusing on the mechanical and financial logic of partial repairs. We will examine the physics of door balance, the market dynamics of spare parts, and the specific decision-making frameworks required to determine when a repair is a viable long-term solution versus a temporary delay of an inevitable failure. By treating the garage door as a modular mechanical system rather than a monolithic object, property owners can achieve structural resilience while adhering to strict budgetary boundaries.
how to plan panel replacement on a budget

Adopting a strategic mindset for how to plan panel replacement on a budget begins with the identification of the manufacturer’s “ID tag,” typically located on the side or interior of the door panels. This tag is the cornerstone of the budget project. Without it, the search for a compatible panel involves manual measurements of tongue-and-groove joints and stamping depths, which often leads to the procurement of a “near-miss” component that fails to seal properly. A proper plan avoids the retail markup of major home improvement centers and instead focuses on “dead stock” inventories or localized distribution warehouses that specialize in replacement sections.
One must also account for the physics of the “Balance Shift.” A garage door is balanced by a torsion or extension spring system calibrated to the exact weight of the door. Even if you find an identical panel, variations in insulation density or steel gauge can alter the weight of the assembly. If the new panel is significantly lighter or heavier than the original, the door will be out of balance, leading to the premature failure of the opener motor. Therefore, the budget must include a small sequestration for spring re-tensioning, an essential step that many oversimplify or ignore entirely in the pursuit of lower costs.
Finally, the sequencing of the task is critical. The lowest-cost path often involves a “curbside pickup” of the panel and a self-managed site preparation. This includes the removal of the old hardware (hinges, rollers, and brackets) from the damaged section to be reused on the new one—assuming the hardware has not sustained structural deformation. By separating the procurement from the specialized labor of spring adjustment, a homeowner can effectively control the financial variables of the project without sacrificing the safety or performance of the entry system.
Deep Contextual Background: The Rise of Modular Steel
How to plan panel replacement on a budget historically, garage doors were crafted from solid-core wood, often as single, massive slabs or heavy side-hinged pairs. Replacing a “section” was impossible; a rot or a crack necessitated a complete rebuild by a master carpenter. The introduction of the sectional overhead door in the mid-20th century revolutionized the industry by introducing a modular approach. The shift toward galvanized steel and aluminum in the 1970s and 80s further refined this, as panels could be mass-produced in standardized widths and heights.
However, the “modular promise” became complicated by the proliferation of branding. Companies like Clopay, Wayne Dalton, and Amarr developed proprietary interlocking systems—the way the panels “stack” and “seal” against each other. This created a fragmented market where a panel from Brand A will not sit flush with a panel from Brand B. Understanding this historical fragmentation is essential for the modern budget planner; you are not just buying a piece of steel; you are buying a specific geometric interface that has its roots in decades of industrial competition and proprietary engineering.
Conceptual Frameworks and Mental Models How To Plan Panel Replacement On A Budget
To evaluate whether a partial replacement is the correct fiscal move, apply these mental models:
-
The 50% Rule: If the cost of the replacement panel, shipping, and labor exceeds 50% of the cost of a brand-new, modern door, the repair is likely a poor long-term investment. Modern doors offer improved R-values and safety features that justify the higher capital expenditure.
-
The Fatigue Gradient: Damage to the bottom panel is often isolated. However, damage to the top panel—where the opener arm attaches—is often a sign of motor-induced stress. Assessing whether the damage was an “event” (impact) or a “process” (fatigue) determines the success of the replacement.
-
The Component Synergy Model: Treat the door as a chain. A new panel in a chain of four old, rusted panels will only last as long as the weakest link.
-
The Aesthetic Half-Life: Steel panels fade at different rates depending on UV exposure. A new panel will never perfectly match an old one. The planner must decide if they are “budgeting for function” or “budgeting for appearance.”
Key Categories of Panel Damage and Materiality
The materiality of the door dictates the feasibility of a budget replacement.
Realistic Decision Logic
For most suburban applications, a Single-Layer Steel replacement is the most budget-friendly. However, if the door is Triple-Layer Polyurethane, you must match the insulation type exactly. Polyurethane is denser and heavier than polystyrene; mixing these insulation types within the same door assembly creates a weight imbalance that even a professional spring adjustment may struggle to compensate for.
Detailed Real-World Scenarios How To Plan Panel Replacement On A Budget
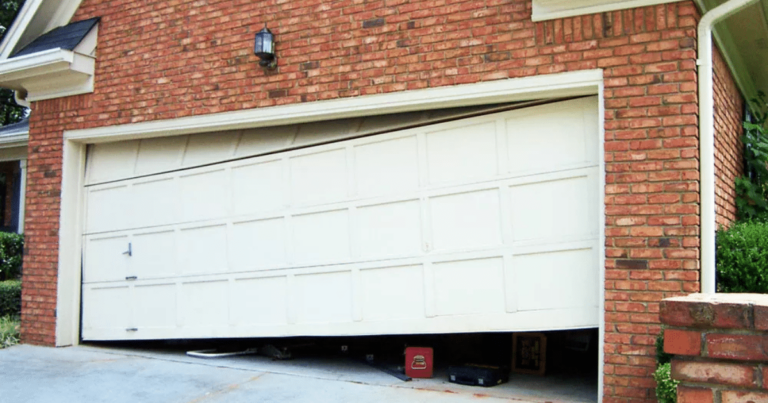
Scenario 1: The “Back-into-the-Door” Incident
The bottom panel is crumpled by a vehicle bumper, but the tracks and opener are unaffected.
-
Budget Strategy: Order just the bottom section with the pre-installed bottom weatherstrip.
-
Constraint: The manufacturer no longer produces the specific “almond” color.
-
Solution: Order a white panel and spend $40 on high-quality exterior latex paint to match the entire door, rather than paying $800 for a custom-colored panel.
Scenario 2: The Top-Panel “Opener Tear”
The metal around the opener’s reinforcement bracket has cracked due to a lack of a proper “strut” or stiffener.
-
Budget Strategy: Instead of replacing the panel, install a 20-gauge steel reinforcement strut across the entire width of the existing panel.
-
Result: This “repair-in-place” costs $50 vs. $400 for a new panel, effectively solving the structural problem on a micro-budget.
Scenario 3: The “Discontinued Design” Dilemma
A 15-year-old door has a rusted middle panel, but the model is discontinued.
-
Budget Strategy: Search for local “garage door boneyards” or installers who have “take-down” doors in their warehouse.
-
Result: Procurement of a used, but structurally sound, panel for $50, which is then sanded and repainted.
Planning, Cost, and Resource Dynamics
The economic impact of panel replacement is largely hidden in the “shipping and handling” fees, as a 16-foot steel panel is an “oversized” freight item.
Range-Based Resource Table
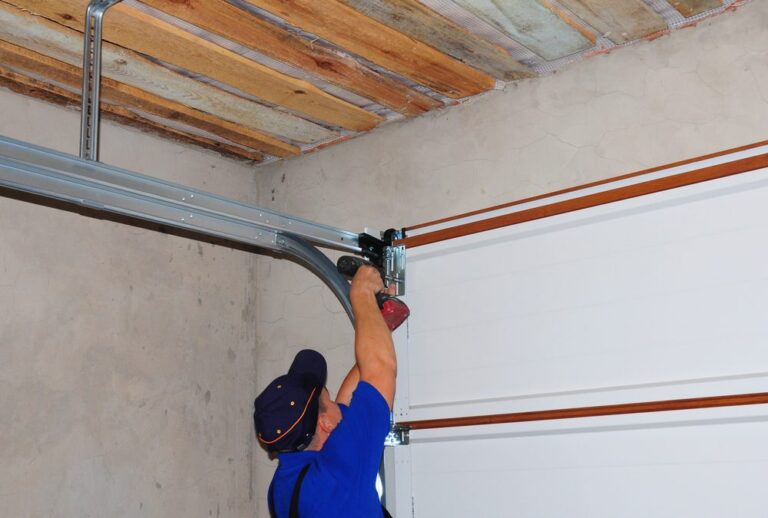
Tools, Strategies, and Support Systems
A budget-conscious replacement requires a specific set of tools to ensure the door remains square during the swap.
-
Vice Grips (2 pairs): Critical for locking the door in the vertical tracks so it cannot move while a middle section is removed.
-
Impact Driver: For transferring hinges quickly without stripping the self-tapping screws into the thin steel.
-
Winding Bars: If the springs must be unwound to safely remove the cable tension.
-
Sawhorses: To support the new panel while hardware is being transferred.
-
Digital Scale: To weigh the old panel and the new panel to identify weight discrepancies before re-installation.
-
Painter’s Tape and Touch-up Kit: Because even the most careful installation will result in minor surface scuffs.
Risk Landscape and Failure Modes How To Plan Panel Replacement On A Budget
The primary risk in localized replacement is the “Unseen Structural Deformity.”
-
Track Misalignment: If the impact that damaged the panel also slightly “tweaked” the vertical tracks, the new panel will bind, even if it is an identical match.
-
Spring Snap: Increasing the weight of the door (e.g., replacing an uninsulated panel with an insulated one) without upgrading the springs can lead to a catastrophic spring failure within months.
-
Water Infiltration: If the tongue-and-groove joint of the new panel is even 1mm off, it will allow driving rain to enter the garage, potentially damaging items stored inside and rotting any wood framing.
Governance, Maintenance, and Long-Term Adaptation
A new panel must be integrated into a long-term maintenance cycle to ensure it doesn’t fail prematurely.
The Post-Replacement Checklist:
-
Month 1: Check the “hinge-pull.” Ensure the screws are not backing out of the new steel skin.
-
Month 3: Inspect the “light-seal.” Close the door and look for light coming through the joints of the new panel.
-
Quarterly: Lubricate the hinges on the new panel. New steel is often “dry” and can squeak, leading to localized wear.
Measurement, Tracking, and Evaluation How To Plan Panel Replacement On A Budget
How do you determine if your budget plan was a success?
-
Leading Indicators: The door operates with the same decibel level as before. A “clunk” at the new panel joint indicates a misalignment.
-
Lagging Indicators: The opener motor does not feel hot to the touch after three cycles. If it is hot, the door is imbalanced.
-
Qualitative Signal: The “Curb Appeal Test.” From 20 feet away, is the color match and stamping pattern seamless?
Common Misconceptions and Oversimplifications
-
Myth: “You can just beat the dent out of a steel panel.” Correction: Once steel is “creased,” its structural integrity is gone. It will eventually buckle under the stress of the opener.
-
Myth: “All 16×7 doors are the same.” Correction: There are dozens of joint profiles. Buying a “generic” panel is a guaranteed failure.
-
Myth: “I can save money by only replacing the skin.” Correction: Modern panels are bonded units. You cannot replace just the exterior steel without destroying the insulation and interior skin.
-
Myth: “The middle panel is the easiest to replace.” Correction: The middle panels are the hardest because you have to “stack” the door sections above them and hold them in place with vice grips.
-
Myth: “A dented panel is just a cosmetic issue.” Correction: A dented panel creates drag in the tracks, which can eventually burn out a $500 opener.
Synthesis and Strategic Judgment How To Plan Panel Replacement On A Budget
The path of how to plan panel replacement on a budget is a journey of precision and patience. It is an editorial decision to prioritize the core mechanical function of the home over the convenience of a “new” purchase. By identifying the manufacturer, managing the weight variables, and sourcing components through non-traditional channels, a homeowner can extend the life of a $2,000 door system for a fraction of that cost.
Ultimately, successful panel replacement is about understanding the lifecycle of residential hardware. It is a refusal to accept the “disposable” nature of modern construction. A well-executed partial replacement is a testament to technical literacy and fiscal discipline, ensuring that the garage—the largest entryway to the home—remains secure, balanced, and aesthetically sound for the years to come.